Sunday, 27 October 2013

That Craft Place - Halloween Challenge

Morning! 
 
 So who remembered to put the clocks back and who didn't??
 
I am getting ready to brave the storm we have heading our way from tonight.  Looks like it could be a biggy!  Guess I will be stuck indoors for a while which I guess means a few major crafting sessions coming up.  Perfect excuse if you ask me!!
 
Anyway its time for our new challenge over at TCP, and seeing as the bad weather is on its way, you have no excuse for not entering!!
 
Our challenge this time is


I have used the super cute Fast Food Fly By image from Saturated Canary and printed her using the 'No Lines' technique.
 
She is coloured using copics and kept it simple to show of the colouring.  I used a shaped card blank and some basic embellishments to add some interest.  The sentiment is from CC designs.  Everything else was from my stash.
 
 
Now for something extra exciting!!
 
We are having a DT call over at That Craft Place.  You can find full details of this on our blog.
This really is a wonderful team to be on!
 
xx
 
I would like to enter this into the following challenges


Wednesday, 16 October 2013

All Dressed Up - Grounding and Grass tutorial

Good Morning fellow crafters!  
 Today I am answering a Facebook query posted by Lyndsey Turner who asked about grounding images and colouring grass.
 
I have used one of the Three Little Autumn Girls that can be found HERE for tutorial.  I hope you find it useful.  This is my first tutorial of this type so any pointers or if I have missed anything please feel free to comment and ask further questions.  I will try to help as best I can. 
 
This tutorial is based on what I do when colouring, there are various different things you can do but these are my methods!
xx
 
(all colouring is done with Copics)
 
~~~~~
 
Grounding
 
First finish colouring your selected image.
I then used C4 to colour a direct shadow underneath her feet, then C2 and C0 blended out so the shadow appears lighter.


This looks pretty simple but it certainly makes her look like she is standing on something rather than floating on the page.
 
~~~~~
 
Colouring Grass
 
Again start by colouring your image.
 
For the sand/ground I have used a mixture of  'E' colours and some W4.
 
The first colour I applied was E55. Start by scribbling some small areas.
 
 
The next colour was W4, and I did the same again to begin filling in the gaps.
 
 
Then I used E23, E29 and E35.  These can be used in any order and any combination.
 
 
Now we start on the grass.  I used YG97 and holding the pen vertical and lightly against the paper use a small flicking motion upwards.   This will give the illusion of a thicker stalk nearer the ground and then tapering off to complete the blade.
 
 
I then did the same using the YG67.
 
 
And then finished the grass off with the G24. 


The grass looks much more realistic and effective done like this, in smaller blades or clumps rather than colouring a large area.  You will notice that the blades go over the boots and the soil.  This helps to ground her.  I finished off the image by using the W4 directly under her feet just to add a little more depth.
 
 
I hope you have found this helpful.  These are really the first stages we can go into more detail by adding flowers etc another time.
 
Don't forget to join our FB fan page and leave your questions for myself and Lisa Horton to TRY (!) and answer!!
 
Have fun...... 
 
Ohh ..... why not give this ago and enter our latest challenge
 
xxxxx


Sunday, 13 October 2013

That Craft Place Challenge = In the PINK!

I am back today with my first post for while for That Craft Place.
The lovely Lisa and Erin allowed me some time to get myself back on track but now I am here again!!
 
This week we are launching our
 
PINK
 
challenge!
 
Think that is kinda self explanatory ..... we want to see lots of pink!!
 
Here is my card.... I have kept it very simple to show off the gorgeous image by Sureya, an extremely talented artist.  I have use copics to colour her up.
 
 
The black and pink card are from papermania.
The sentiment is one of a set from MFT which I purchased along with the shredded ribbon from instore.
The skull was one of a few I was given as part of a Halloween swap last year and has been sat waiting for the perfect project.  I think she finishes it off just right!
 
I hope you like my inspiration and decide to have a go....
Pop over to the challenge blog for full details and some AMAZING creations from the girls..... boy are they awesome!!
xx


Thursday, 3 October 2013

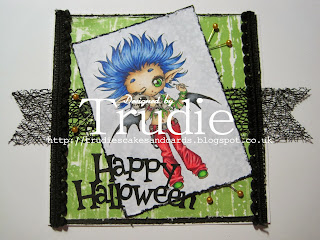
Make it crafty Vamper Voodoo

Make it Crafty have some new brilliant Halloween style images which I totally love!
 
The first one I have coloured up is Vamper Voodoo


I have used Copics to colour the image and kept the card very simple to show him off.  The green backing paper is from Glitz design and is an older design from my stash.  Happy Halloween has been cut on the Cameo.  Ribbons from stash.  And what Voodoo card would be complete without a few pins!!!!
 
I would like to enter this into the following challenges


Wednesday, 2 October 2013

ALL DRESSED UP

Hello friends and welcome to my first post for All Dressed Up.  I am excited to announce that I was asked to join the team as a colouring specialist.  Myself and Lisa Horton will be available on the Facebook fan page to answer any colouring related questions and provide demos and tutorials for you all.  More details can be found on the FFP.  But anyway, back to the matter in hand, today we lauch our new challenge!
 
 Full details can be found for this on our challenge blog where you will also find some beautiful inspiration projects from the new team. 
 
I have used 'My Best Friend' for this 6 x 6 card.


Items used-
Copics,
Doily,
Die-namics Ovals
Papers from Bird Song by First Edition
Resin flowers and pearl swirl from That Craft Place
Sentiment by MFT
 
I look forward to seeing what you all make with these super cute images.  They are so adorable to colour!